So this was an adventure I put together just after the release of the 5th Edition of Dungeons and Dragons. I usually document adventures like this on a personal wiki my group keeps and I thought it may be good to share with other people that fancy a quick, combat heavy adventure site to play, especially since the D&D 5th OGL has just gone live.
Snapshank Canyon
Snapshank Canyon is a small adventure site for first level characters. By the end they should either be 3rd level, or very close.
When they reach the canyon read the following description.
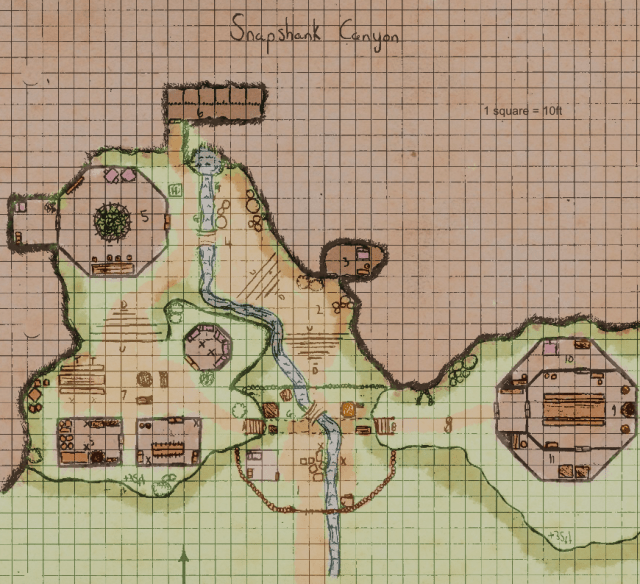
You have reached Snapshank Canyon. The gully entrance is fenced off by a high palisade and about the craggy hillside you can see several buildings that have been constructed, each connected by bridges. The entrance to the gully is watched over by a guard tower.
The players can approach this in many ways. The guard atop the tower has good visibility on anyone trying to enter. However, like many bandits he has a vice for ale and on an evening is often drunk, making it easier to sneak in. If he detects intruders he will sound the alarm, attracting the attention of people in area 1.
If the PC’s declare themselves they may be able to negotiate their way inside where they will be taken to area 9 before Reaver himself. At the slightest provocation he will attack the players. Regardless of what he does, he will try and rob them.
- The Gully Bottom
In this area there is a watchtower with a bandit in it, as well as two more marked by Xs on the map. The river that runs through the area is a fast flowing and anyone falling over it must make a DC15 Athletics check or be swept 15ft along with it. A character may also attempt to jump over the bridge by making a DC10 Acrobatics check. At the south west end of the area is a small hut that houses the guards of this area. Should they hear the commotion outside they will rush out to aid their comrades. Within this hut are two more bandits. Towards the north western part of this area there are several cages, many of which contain travelers captured from the road. They are being tormented by a gnoll which is marked by a G.
The house contains a trapped chest which can be detected on a DC:10 perception check. The trap can be disabled on a successful DC15: Dex check made with thieves tools. If the party open the chest without first disabling it the character doing so is shot with darts. The attack a +5 ranged attack that deals 1d4 damage on a successful hit. The contents of the chest are determined by rolling on the Individual Treasure table for CR 0-4 monsters on page 136 of the Dungeon Master’s Guide. The enemies each carry their listed equipment as well as individual treasure which is determined by rolling on the Individual Treasure table for CR 0-4 monsters on page 136 of the Dungeon Master’s Guide for each enemy searched. The gnoll also carries the keys to the cages. If let out the captives tell the PC’s that they were all captured on the roads and that several of them were previously held in the prison in area 6.
- On the steps
The stairs here lead up to a small landing before continuing. There will most likely be an ogre here that lives in area 3. It will attack the players on sight and attempt to kill them. It has loot appropriate to its level; roll on the Individual Treasure table on page 136 of the DM’s Guide.
- The Ogre’s Cave
This small cave is the home of the ogre in area 2. There is little beyond a destroyed bed and a long chest. Within the chest is random treasure. Roll the Individual Treasure table for CR 0-4 monsters.
- The First Landing
The stream that flows through here is a dammed up at where it flows on the northern edge of this area. If the gnolls, marked by G’s on the map are aware someone is approaching they will attempt to open the adjacent valve, releasing the water across the area. Anyone on the steppes or area 2 will be washed downwards into area 1, suffering 1d4 hit points as they do so. A character may hide in area 3 and be unaffected by the water. As soon as the rushing stops a round later, the gnolls will use the opportunity to launch an attack. They will do this by unleashing the 4 hyenas locked in the cage marked H to harry the attackers as they pepper them with arrows.
- The Lair of Gnoll Lord
This large hut is the home to Enoghu, the Gnoll beast master that presides over the gnolls within the gully. As they enter, read the following.
You enter into the smoky residence and are met with a cacophony of wild hideous laughter. In the centre of the room is a pit, at least ten foot deep and filled with vipers. About the edges two more of the hyena men eye you hungrily. At the far side is the pack lord of these infernal humanoids. Standing nearly seven foot tall, the beast’s slavering jaws issue forth a challenge to the party as he lets go of the leash to several hyenas.
The gnoll pack lord is in fact a coward. He will avoid a melee fight if he can but if pressed he will try and push someone into the pit of snakes. If the fight is seriously going against him he will flee to the back room. The pit contains a swarm of poisonous snakes that are detailed on page 338 of the Monster Manual. A character who falls into the pit may take an action to climb out. They are able to climb out if a successful DC:10 Athletics or Acrobatics check. The pack lord has random treasure as determined by the Individual Treasure table for CR 0-4 monsters. He also carries the keys to the prison cells in area 6
In the back room there is a bed and a pile of gore from the pack lord’s previous victims. In the corner is a locked chest (open on DC: 15 Dex check made with thieves tools or a DC: 15 Str check). The contents of the chest are as follows; 3d6 gp, 1d6pp, a potion of healing and ten +1 arrows.
- The Prison
This small cave is where prisoners are kept. All of the travellers were snatched from the road. The bars may be broken open with a DC: 25 Str check, or the locks maybe picked with a DC: 20 Dex check. Jarthen, the court wizard of Mystwold is being kept here. He is a capable elven scholar with a good insight on all things arcane, however, he is unlikely to want to travel with the PCs more than he has to. He wishes to return to Mystwold as soon as possible. All the people here were captured on the road, however Jarthen was snatched inside the town. He remembers only leaving the longhouse late at night, then a sharp pain on the back of his head. When he came round he was in the clutches of the Crimson Cloaks.
- The Upper Landing
This area is the housing and living areas for the bandits. The hut to the north east is a sleeping area with several beds, the building to the south is an armoury that contains shortswords and chainmail, as well as two chests, one that contains nought but clothing to wear over armour and the other contains Individual treasure as determined by the Individual Treasure table for CR 0-4 monsters. Finally, the building in the south western corner is a kitchen, where several crates of food are stored and boiling pot of stew is almost constantly maintained. The area has 8 bandits as marked by Xs, and two thugs as marked by Ts. If the enemies are unaware of the party’s approach they will be in the places labelled on the map otherwise they will have taken up defensive positions. If the fight is going badly they will flea across the bridge and relase the bears in area 8, then if that fails they will try and cut the bridge. As marked by an A is a bridge that spans to point B in area 8. The bridge hangs over area 1 and anyone falling from it takes 2d10 damage, which is halved on a successful DC: 10 Dex save.
- Bear Landing
Two bears are chained to wall here which one of the bandits may try and release as they flee into Reaver’s hall.
- The Hall of Reaver
When the PC’s enter the hall they may find it barricaded if the bandits have had chance to prepare a defence. Reaver will not go down easily, however if he is reduced to low enough hit points and enough of his allies are dead he will surrender and beg for his life. Otherwise he is arrogant, taunting the characters into giving in to him. He uses the rules for a bandit captain as given on page 334 of the Monster Manual with a few exceptions. He does not use a scimitar, instead he uses a longsword that has a +1 enchantment placed upon it. He also has a cloak of fire resistance that halves all incoming fire damage on him. When the PC’s enter this room, read the following:
You have entered the luxurious mead hall of Reaver the Bandit King. The walls are festooned with trophies of past conquests, troll skulls, clerical robes, huge and vibrant tapestries. About the room are several bandits who have their weapons drawn and ready to attack. Their hesitation is but the choice of the man sitting upon the throne at the far end of the room. He is younger than you expected, with swarthy features and a forked beard. Wearing leather armour adorned with more daggers and knives than you can count he stands up and slowly slides his longsword from its sheath. The weapon glitters extraordinarily, emanating a cool unnatural glow. He smiles and looks at you and then begins to speak. “This weapon has tasted the blood of better folks than you. I ask you to surrender. You have my word and my honour that you will not be harmed if you comply willingly. Otherwise, I shall open your throats.”
Reaver is a CR 2 and ½ enemy. Feel free to add as many bandits to the room as necessary to make the fight challenging, with the recommendation that the CR rating be 2 higher than the party.
- Reaver’s Bed Chambers
This room is the bed chamber of Reaver. It is also his personal treasure cache. About the room are various bags, coffers and pieces of treasure to be taken as reward. Roll on the treasure hoard table for CR 0-4 on page 137 of the Dungeon Master’s Guide to see what is in the hoard. Also amongst the loot is a tattered letter, see handout #1 for details
- The Slave Chambers
This is just a room full of cages for Reaver’s personal slaves. Mostly young human and elf women (and a young man) they are locked in cages with the keys placed callously just out of reach. Once the cages have been opened they are extremely thankful.
Map of the Canyon